Rule-Based Activity Recognition
This project aims to provide rule-based activity recognition by using different sensors in the smart home environment called Human Health and Activity Laboratory (H2Al) at Luleå University of Technology (LTU). The project also aims to provide a way to easily connect different types of sensor data in the lab.
Rule-based activity recognition means to have a set of rules, which can be either true or false, and let them define a certain human behaviour. A rule-based scenario could for example look like this:
If
- A person is in the kitchen
- The fridge has been opened recently
- And the stove is currently on
Then
- Assume that a person is currently preparing food
A scenario could be a lot simpler or a lot more complex than this.
Table of Contents
- Currently Supported Input
- Currently Supported Output
- Installation
- Running the Application
- System Architecture
- Adding New Input
- Adding New Output
Currently Supported Input
H2Al contains a number of different sensors which can provide input data for the rules. The are more sensors in the lab than the ones listed below, and we have tried to make it as easy as possible for a programmer to add new input sensors. This process is explained in the section Adding New Input. Input data is not restricted to only the type of sensor data found in the lab.
WideFind
WideFind is a swedish positional system developed in Luleå. The system uses reference points to track a wireless receiver in a room. In this project we use vectors to measure the distance between the receiver and different objects in order to approximate where in the lab a receiver is located.
Z-Wave (Fibaro)
In H2Al, Z-Wave sensors are found in e.g. doors and cabinets. Door sensors hold an internal states which says if the door is open or closed. The sensors are configured with a Fibaro Home Center 3 hub. Data, such as states, can be gathered from the Fibaro hub. We have not managed to make Fibaro send events when a state is changed so instead we use a thread which simulates an event once per second by gathering and forwarding the internal states. There are many other sensors configured with Fibaro (such as thermometers, moisture meters, power sockets etc.), but we have only managed to make the door and cabinet sensors work.
Simulator
A simulator is provided for simulating a simple scenario. The simulator sends “fake” Z-Wave and WideFind data to the application and it can be used to test functionality. By changing the Simulator.py class it is possible to change to simulated events to one’s liking. The simulator executes in its own thread.
Currently Supported Output
Some gadgets in the lab can be used as output for a rule if we not only want to recognice a certain activity, but also have something happen during that activity. The processes of adding new output is explained in the section Adding New Output. An output could be virtually anything and is not restricted to be something in the lab.
Philips Hue
Philips Hue is a smart lighting system with highly configurable light bulbs. By connecting to a bridge it is possible to change the brightness and color of a light bulb.
Discord
By creating a webhook in a Discord server and connecting to that webhook it is possible to send messages to the server. This could be used to receive live updates from the lab while not being present there.
Installation
- Clone the main branch of the project repository or download it as a Zip
- Create a file called
config.tomlin the root directory (see Creating the Config File) - On Windows:
- Run
D0020E_Interface.exe
- Run
- On other operating systems:
- Download Godot Engine and use it to open the project file
project.godot - Compile the project for your operating system
- Download Godot Engine and use it to open the project file
Creating the Config File
In order for the application to connect to the different sensors and gadgets, it is necessary to create a config file in the application root directory and call it config.toml. This file must look exactly like this:
[widefind]
enabled = true
ip = "..."
port = ...

[fibaro]
enabled = true
ip = "http://.../api/"
user = "..."
password = "..."

[phue]
enabled = true
ip = "..."

[discord]
enabled = true
url = "..."
Replace the dots with the necessary information. When adding new input or output functionality it is recommended to add connection information, such as ip addresses or URL:s, to the config.toml in the same way as shown above and then read the information to the main application. This should be done to keep sensitive information from being displayed in the application itself. Full tutorials for adding input and output can be found in sections Adding New Input and Adding New Output.
Running the Application
When starting D0020E_Interface.exe the user will be presented with three choices: USER, TEST and ADMIN. No rulesets are defined when starting for the first time so press USER and then Add New to make new rules. Name your ruleset to rule_#, replacing the hash with any text. Then choose desired input and desired output for a rule. Input and ouput can be combined in any manner. Press Save to save this rule to the specified ruleset. If you want to add more rules to this set, choose the newly created ruleset, choose input and output and press save again. Add as many rules as you like. If discord_0_send is chosen you will have to write a message to send to the Discord webhook in the box OutPut Argument for General.
See EXPLANATIONS.toml for mapping between ID and physical object. Door 42 is for example the front door to H2Al. EXPLANATIONS.toml should also be updated when new input or output is added to make it clear which ID corresponds to which object.
Press the cogwheel to go back and press USER again to see all created rulesets. Choose your ruleset and press Run Selected Rule to start the application for the selected ruleset. Press Stop Selected Rule to stop the application. Rulesets can be changed and removed.
If you want to run a simulator in order to test a specific ruleset, go to the start menu and choose TEST. Choose the ruleset you want to test and press Run Simulator to start the simulation. The simulator’s default configuration is to send Z-Wave door and WideFind position updates for about a minute. The simuator can be edited by changing the messages in the file /Input/Simulator.py.
The ADMIN panel currently doesn’t let you do anything special. Here you can also modify rulesets like on the USER panel and the plan is to expand it sometime in the future.
System Architecture
The class diagram below presents an overview of the system architecture.
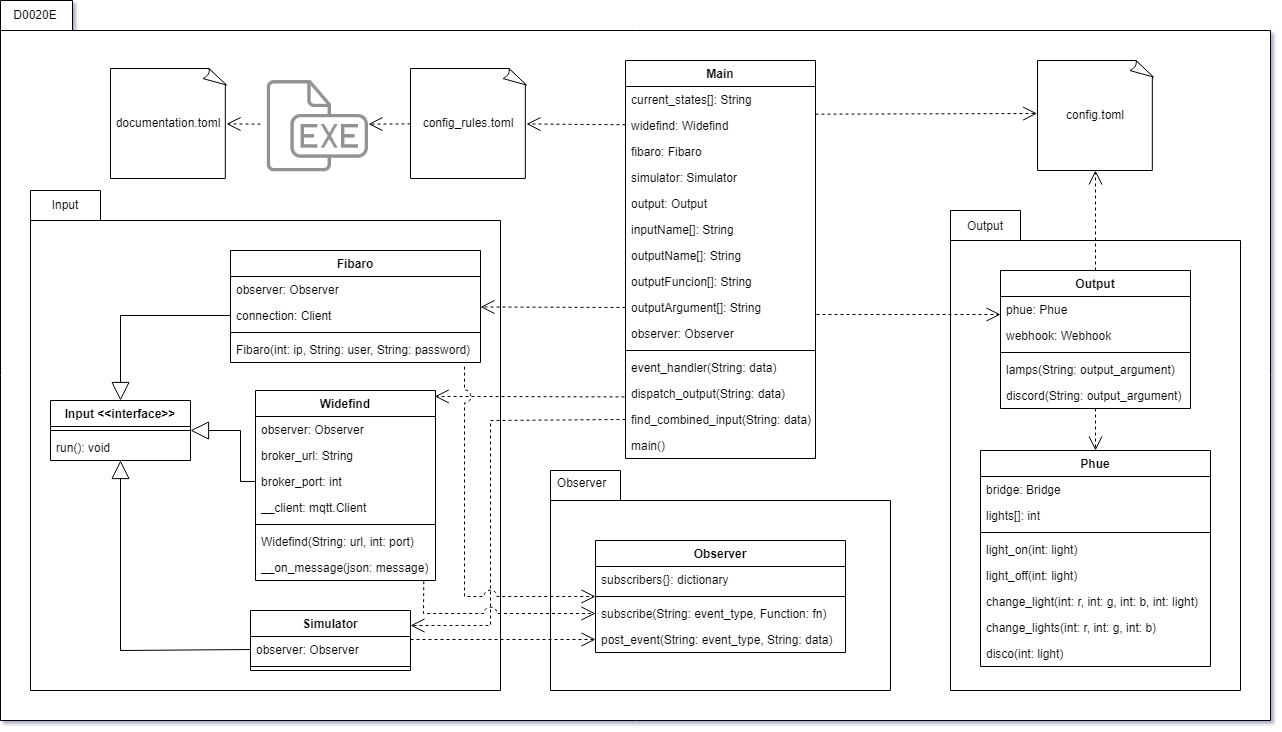
When running the program D0020E_Interface.exe it reads all defined input and output from documentation.toml. When rulesets are created in the application they are saved to config_rules.toml. This file is then read by the Main object when starting the program, since it contains the rules for this run. Upon starting a run, the Main and Output objects also read the file config.toml which contains necessary setup information.
Adding New Input
These last two sections are intended for administrators and those who have some programming knowledge as they involve changing the source code and thereby the program structure.
Since adding input and ouput involves changing the source code it can of course be done in many ways, but we recommend following our conventions in order to maintain the internal structure. The major steps for adding a new type of input are:
- Creating a class that inherits the
Inputinterface - Implementing the method
run()in the class and have it notify observers when it wants to send data- In this step one should come up with names for the sent data that follow the structure
object_id_status - It is recommended to have data come in pairs (for example
door_1_openanddoor_1_closed)
- In this step one should come up with names for the sent data that follow the structure
- Updating the list
inputindocumentation.tomlto also contain your newly defined data strings - Adding connection data that shouldn’t be in the source code (such as IP:s and passwords) to
config.toml - Creating an instance of the new class in the
__init__()method inmain.pyand executing itsrunmethod - Updating
EXPLANATIONS.tomlwith information about which ID corresponds to which physical object and other important notes- This step is not mandatory but recommended for understandability
Each step will be explained in more detail below.
Creating a Class
Go to the folder Input and create a new class that implements the interface from Input.py. This interface contains a method __init__() and a method run(). On init the object must create an observer object via observer = Observer(). The observer is contained in the Observer folder and must be imported to the class. During initialization the object should also perform all connections to services of the program.
Implementing the Run-Method
The method run() should be responsible for sending data to main via notifying observers since the method event_handler(data) in main.py is an observer. Implement the method, make it work for your purpose and perform observer.post_event("Event", ...) every time you want to send data, replacing the dots with a string of your choice. Here it is up to you to choose appropriate names for your data. In order to work well with the rest of the program, the data should follow the naming convention object_id_status where object is the actual object (e.g. a door or sensor type), id is the unique ID for this object and status is the current status that got changed into (note that the objects in this context doesn’t refer to the instance of the class). In most cases it is recommended that the sent data come in at least pairs i.e. that object_id_... has two or more statuses. Since the current states are always stored in main this could create more complex scenarios. A door should for example have the statuses door_1_open and door_1_closed instead of only knowing when it’s opened.
Updating the Documentation
The new names that you have come up with for the sent data must also be placed in documentation.toml in order to be read into the interface. Simply go to the file and add your new names to the list input.
Adding Connection Information
If an input requires URL:s, IP addresses, usernames or passwords in order to connect to some client or service they should not be placed in the source code. This is the purpose of config.toml. Go to this file and add a field for your new input. To this field, add enabled = true (this is very useful when debugging) and your sensitive information.
Creating and Running a New Object
The new object has to be created somewhere and this is done in main.py. Go to the __init__() method and add if config["YOUR_INPUT"]["enabled"], and then inside that if-statement create your new object with the information from the config file if you used that. Add the line YOUR_OBJECT.run() for your object to start sending data. If done correctly the method event_handler(data) will be notified when something happens.
Sometimes it might be prefarable to let the object execute in its own thread (this is useful if the input doesn’t support events and has to be configured to simulate events manually). For this we use Python Threading by creating the object normally, creating a new thread and have it target the method YOUR_OBJECT.run and then performing YOUR_THREAD.start(). This is how it looks like in the case of the simulator:
if config_rules["simulator"]["enabled"]:
    simulator = Simulator()
    simulatorThread = threading.Thread(target=simulator.run)
    simulatorThread.start()
Please note that the simulator reads from config_rules.toml. This is only the case for the simulator and everything else should read from config.toml.
Adding Explanations
Go to the file EXPLANATIONS.toml and add some comments about your new input. Explain which ID corresponds to what physical object and other important information that could be useful for someone wanting to use the program.
This step could be considered optional since it doesn’t change how to program works but it is highly recommended in order to maintain understandability.
Adding New Output
How you structure your output is highly up to you. The major steps for adding a new output are however:
- Defining a new method in
Output.pythat will be called frommain.py - Adding initialization data to
config.tomlandOutput.pyif necessary - Updating
documentation.tomlwith the new output - Adding explanations about your output to
EXPLANATIONS.toml
Defining a New Output Method
Go to Output/Output.py and define a new method that will handle your new output. This method will be called from main.py each time a specified rule is fulfilled, and it should take a string as an output argument. What you place in your method is entirely up to you since it no longer has any connection to the main application. In our case we created references to other objects.
Adding Initialization Data
If your new output for example has a reference to an object that requires services outside of the program, remember to place any sensitive connection information (such as IP:s or passwords) in config.toml and read that file. This is recommended in order to keep sensitive data separated from the source code.
Updating the Documentation
In order for the new method to be available in the interface you have to update documentation.toml. In this file there are two types of output separated into two fields. predefined_outputArgument is used when the argument sent to the new method is to be hard-coded. Here you specify outputName which could be anything you like, outputFunction which is the newly created method in Output.py and outputArgument which is the hard-coded argument you want to send to that method. The field general_outputArgument is used when you want to let a user of the interface specify what string the output argument should be. Here you only specify the outputName and outputFunction.
One very important note is that the association between outputName, outputFunction and outputArgument is done by list indexing. This means that a connected name, function and argument should be placed on the same index in each of the three lists. Take this example:
outputName      = ["Turn on kitchen lamp", "Turn on livingroom lamp"]
outputFunction  = ["lamps"               , "lamps"                  ]
outputArgument  = ["lamp_2_on"           , "lamp_4_on"              ]
"Turn on kitchen lamp", "lamps" and "lamp_2_on" are all stored on index 0 and correspond to one output while "Turn on livingroom lamp", "lamps" and "lamp_4_on" are all stored on index 1 and correspond to another output. Note however that in this case they use the same output function.
Adding Explanations
As with adding explanations to new input, this step is also optinal but recommended. Go to EXPLANATIONS.toml and add information about which ID corresponds to what actual object and other useful information. See the file for examples.